Version 1.6
from December 25, 2025
This update makes AdGuard VPN CLI more reliable and pleasant to use. We’ve fixed a few login-related bugs and improved how updates are handled, so everything runs more smoothly on Linux. Plus, the VPN client has been updated for better stability and performance.
Changelog
Fixes
Ctrl-C during login breaks Linux terminal #129
Web login link is retained in case of incomplete login #131
When version is rolled back on server-side due to problems with build, VPN CLI continues to offer updating #124
VPN client (AdGuard VPN protocol implementation)
Updated VPN client to v0.19.23
Version 1.5
from August 20, 2025
In this version, the connection to the server has become faster and more reliable, and AdGuard VPN for Linux now depends less on the DNS provided by your ISP. To achieve that, we fixed bugs and updated the VPN client, improving availability in different network conditions.
We also removed the option to log in via email or password in the CLI, leaving only web sign-in. Why? The first option has been considered deprecated for several releases, and now it’s time to get rid of it, making web sign-in the primary method.
Web sign-in is a feature that allows users to log in using web-based authentication methods, instead of traditional passwords. It seems easier and more convenient.
Changelog
Fixes
Config not saved on restart in WSL2 (Windows Subsystem for Linux 2) #108
VPN client (AdGuard VPN protocol implementation)
Updated VPN client to v0.18.18
Version 1.4
from August 6, 2025
Not all the things we do are big and shiny. Sometimes, they are small and subtle. But they matter on the long road to a great product. This update brings the dynamic VPN protocol selection. We automatically detect what VPN protocol is faster at the moment and connect to it. Manual protocol selection is still available, in case you were wondering.
Changelog
Fixes
Automatic startup does not work (add
--boot flag) #92VPN client (AdGuard VPN protocol implementation)
VPN client updated to v0.17.4
Version 1.3
from July 24, 2025
This release focuses on overall stability improvements: we’ve fixed several bugs and updated the VPN client.
Changelog
Improvements
Added ability to specify outbound interface #78
Fixes
AdGuard VPN tries to style the progress log, even though styled output is not supported #103
Logging out can occur when multiple commands are executed simultaneously #98
export-logs exits with a status of 10 upon successful completion #95tunnel.log file disappears upon connection failure #107VPN client (AdGuard VPN protocol implementation)
VPN client updated to v0.16.20
Version 1.2
from March 24, 2025
If you’ve been keeping up with the latest AdGuard releases, you may have noticed that we’ve been gradually adding post-quantum cryptography to our products. Now, it's AdGuard VPN CLI’s turn. Alongside essential bug fixes, v1.2 introduces this cutting-edge security enhancement, providing an extra layer of protection for your browsing.
Here’s the deal: quantum computers are advancing at a rapid pace, and while they’re not yet a threat, they could potentially break current encryption methods in the future. To stay ahead of this risk, we’ve implemented post-quantum cryptography, ensuring that even the most advanced quantum computers won’t stand a chance at decrypting your traffic.
To enable post-quantum cryptography, open the terminal and type the following command:
adguardvpn-cli config set-post-quantum onChangelog
Improvements
Added post-quantum cryptography support #88
Fixes
Connecting through TUN mode is not working on Fedora workstation #58
DNS query is rerouted from IPv6 to IPv4, even when DNS upstream is set to Default #55
When running
adguardvpn-cli update, the network can’t download the new version #62Whenever an error occurs,
adguardvpn-cli exits with code 0 #85If DoH servers are timing out,
adguardvpn-cli times out before background process finish loading #90Notifications do not work on Linux in sudo mode #94
Version 1.1
from October 10, 2024
It’s been only 4 months since the official release of v1.0, but AdGuard VPN for Linux just got even better: meet the v1.1. The biggest improvement is the Exclusions feature, which you may already know from other AdGuard VPN products. We also added a command that allows you to view your subscription information and made fixes that improve overall security and stability.
New feature: Exclusions
This feature drastically improves the usability of AdGuard VPN for Linux. For those who don’t know: this option lets you decide which domains’ traffic should be excluded from VPN routing. This is handy when you don’t need VPN to work for some websites, because it saves you the hassle of constantly turning VPN on and off.
Just like in AdGuard VPN for other platforms, you can use Exclusions in two modes: General (VPN is enabled for all domains except for those in the exclusion list) and Selective (VPN is enabled only for the domains in the exclusion list). Note: each mode has its own list of exclusions.

How to use
To view all exclusion-related commands, type:
adguardvpn-cli site-exclusions -hTo add a domain to the exclusion list of the current mode, type:
adguardvpn-cli site-exclusions add %domain_name%Supported input formats:
domain.com, sub.domain.com, www.domain.com. Use double quotes for wildcards: "*.domain.com"Command example:
adguardvpn-cli site-exclusions add https://www.google.com/To remove a domain from the list of exclusions, type:
adguardvpn-cli site-exclusions remove %domain_name%To view the current exclusion list, type:
adguardvpn-cli site-exclusions showTo remove all exclusions, type:
adguardvpn-cli site-exclusions clearTo change the exclusion mode, type:
adguardvpn-cli site-exclusions mode %mode_name% (or you can just check the current mode using adguardvpn-cli site-exclusions mode)where %mode_name% is
general or selective.Note: the commands listed above (
add, remove, show, clear) are applied to the exclusion list of the current mode. To perform a command for a specific mode, add --for-mode %mode_name% type, for example:adguardvpn-cli site-exclusions add %domain_name% --for-mode %mode_name%New command to view your subscription info
To check your current subscription information and status, type:
adguardvpn-cli licenseYou will see your email and subscription type. Paid users will also see the expiration date of their subscription.
Command-line completion
To make navigating through different and, sometimes, pretty long commands easier, we added the autocomplete feature. To enable it, see the bash-completion hint that is shown after installing or updating AdGuard VPN for Linux. To use the feature, just start typing the command you want and hit the Tab ↹ key — the command will automatically complete with a necessary word or will show a choice of completion options.
Changelog
Improvements
Add website exclusions feature #27
Add a command to view subscription info #12
Autocomplete commands by pressing the Tab key #18
Improve update process #33
Add optional support for notifications #40
Add "script" mode for routes #22
Display the directory path when entering a command
config show #24Auto-detect which routing table should be used on Linux #43
Fixes
Version 1.0
from June 3, 2024
The developers were working hard on the new product, it feels as if instead of writing code, they were carrying the Ring to Mordor. But the result is worth it. Now we are ready to present you our completely new product – AdGuard VPN CLI v1.0. What is it and why is it special?
What do we have for you?
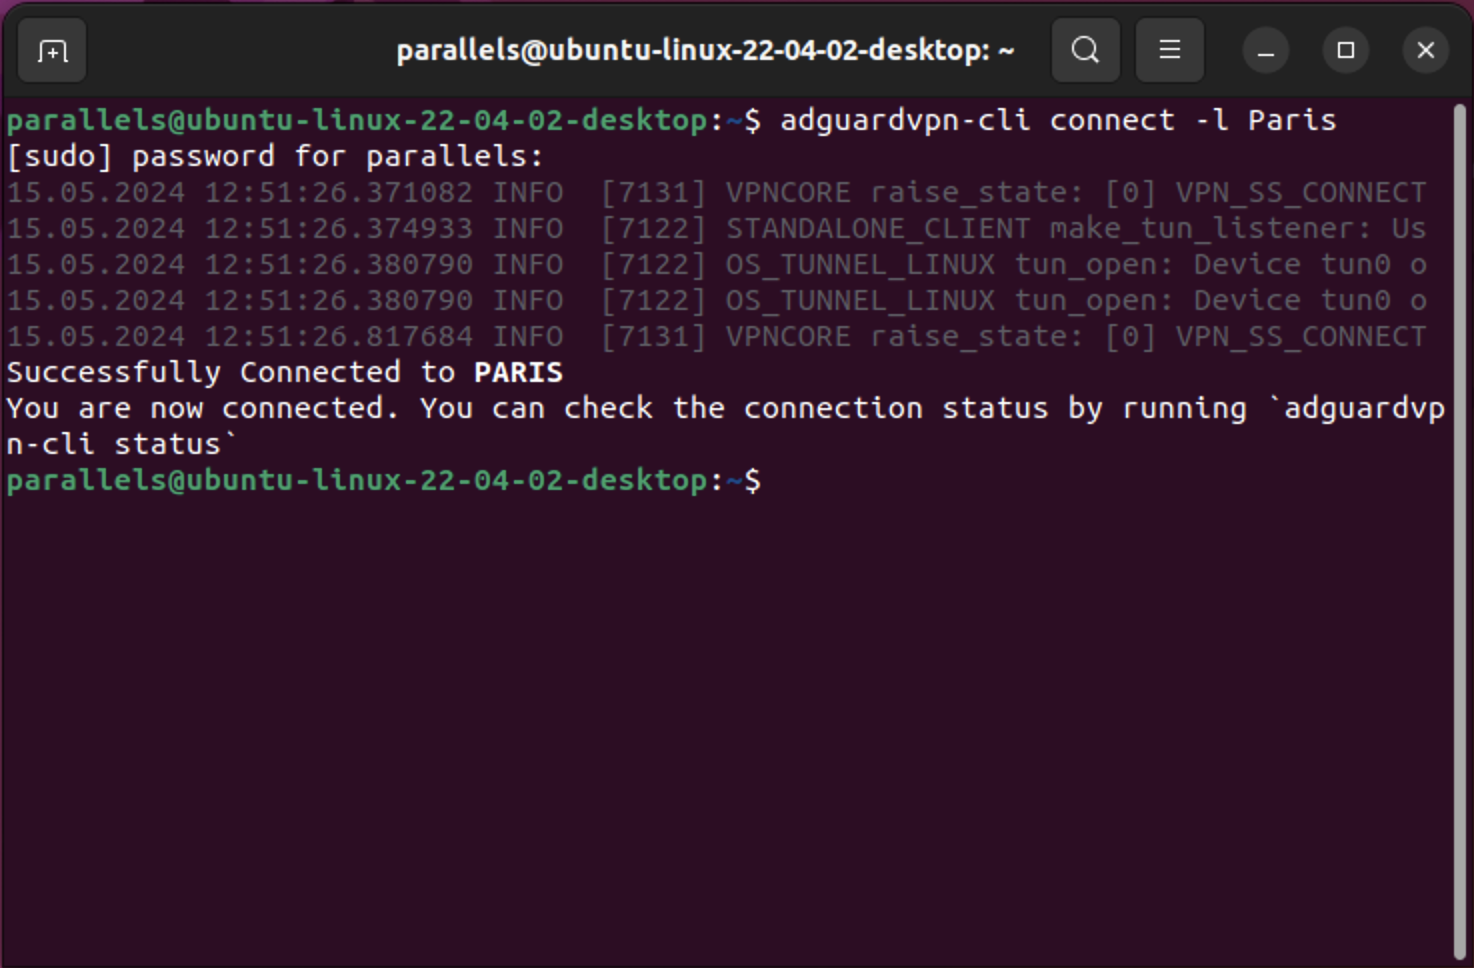
CLI stands for “command-line interface”, which means that AdGuard VPN CLI doesn’t have a user interface. You can use it on Linux, macOS, as well as on MIPS and ARM routers. By the way, AdGuard VPN CLI is our first product that is supported on Linux. So we welcome Linux users to install it and enjoy secure and fast Internet connection.

As you can see, all you need to run AdGuard VPN CLI is the terminal.
Get ready to start
You don’t need to be a computer expert to use AdGuard VPN CLI. Since it doesn’t have a user interface, all the settings are done through the terminal. Let us hold your hand and guide you through the first user experience process.
Firstly, to run AdGuard VPN CLI, open the terminal and type in the following command to start the installation process:
curl -fsSL https://raw.githubusercontent.com/AdguardTeam/AdGuardVPNCLI/master/scripts/release/install.sh | sh -s -- -vFor Beta and Nightly update commands, please check our Knowledge base.
Second, you need to log in or create a new account. To do so, please type:
adguardvpn-cli loginNow you are ready to be invisible on the Internet! If you want AdGuard VPN CLI to automatically connect to the fastest server or the last used location, type the following command:
adguardvpn-cli connectYou can also choose the location by yourself from the list. To do so, please type
adguardvpn-cli list-locations. After you choose the location, type adguardvpn-cli connect -l <location>,where <location> is the city, country, or ISO code of the server location that you’d like to connect to. That’s it! Now AdGuard VPN CLI is ready to protect your privacy.
To see more commands and available settings, check our Knowledge base.
Send your feedback
Since it is AdGuard VPN CLI v1.0 debut, your feedback and feature suggestions would mean the world to us. If you want to help us improve, here’s what you need to do:
Fill out the form
Create an issue on GitHub. Before creating the issue, we recommend you to check the repository. Maybe somebody has already found and reported the same problem.
That’s it! Don’t forget that you can vote for the new features or bug fixes with emojis.
What does the future bring us?
We have a lot of plans to improve our new product. Among the first few features that we want to implement in the next version are:
Exclusions — take traffic under control. Soon our users will be able to add websites to the list of exclusions, so AdGuard VPN CLI will not route their traffic.
Bash completion — make it more user friendly. Even if you don’t type the full command, the program will give you the options to specify the necessary command.
Script mode for routes — set it up as you wish. Now if you set up AdGuard VPN CLI on your router, all traffic will go through the VPN. We plan to make it more flexible, so there will be a new command. You can use it to decide what traffic should and should not pass through AdGuard VPN CLI.
That’s it for now! As always, we appreciate your help and feedback. You can report any problems on GitHub or to our support team. Install AdGuard VPN CLI v1.0 and experience an enhanced level of privacy – adventure awaits!


