Özelliklere genel bakış
Mac için AdGuard VPN, bir masaüstü VPN hizmetidir. AdGuard VPN, AdGuard Reklam Engelleyici ile tamamen uyumludur, birlikte kullanılabilirler ve sorunsuz çalışırlar. Hangi özellikleri sunabileceğine bakalım.
AdGuard hesabınıza giriş yapmadıkça Mac için AdGuard VPN'i kullanamayacağınızı unutmayın. AdGuard hesabınızla veya harici bir hesapla, yani Apple, Google veya Facebook aracılığıyla giriş yapabilirsiniz. Harici hesabınızın AdGuard hesabınızla aynı e-posta adresine bağlı olduğundan emin olun. AdGuard hesabınızda uygun bir abonelik varsa, masaüstü uygulamasında otomatik olarak etkinleştirilecektir.
Still don’t have an AdGuard account? Create it here.
AdGuard VPN for Mac is currently supported on macOS versions starting from macOS Monterey (version 12).
Ana ekran
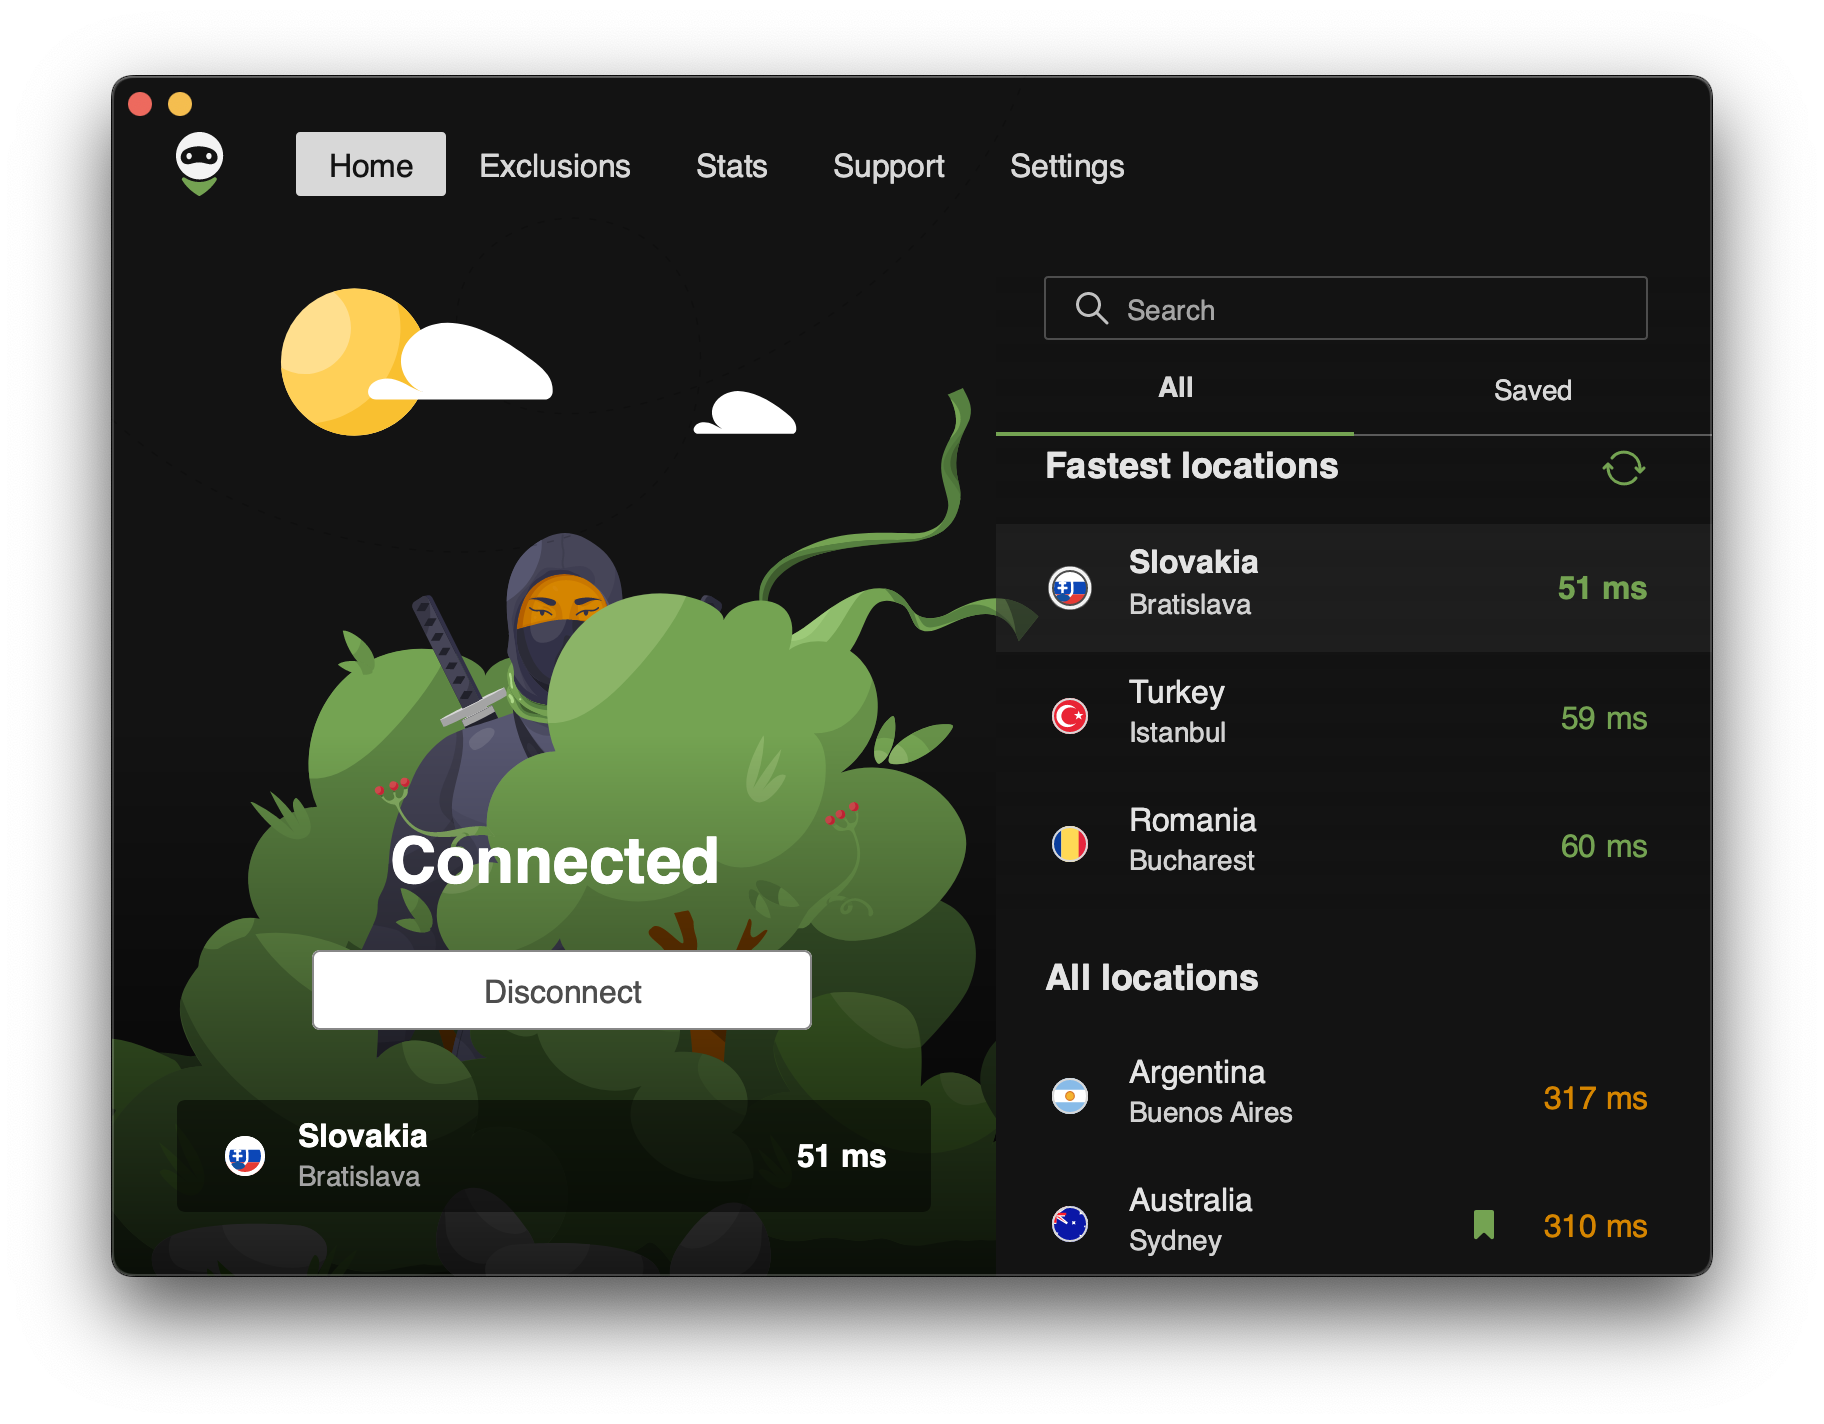
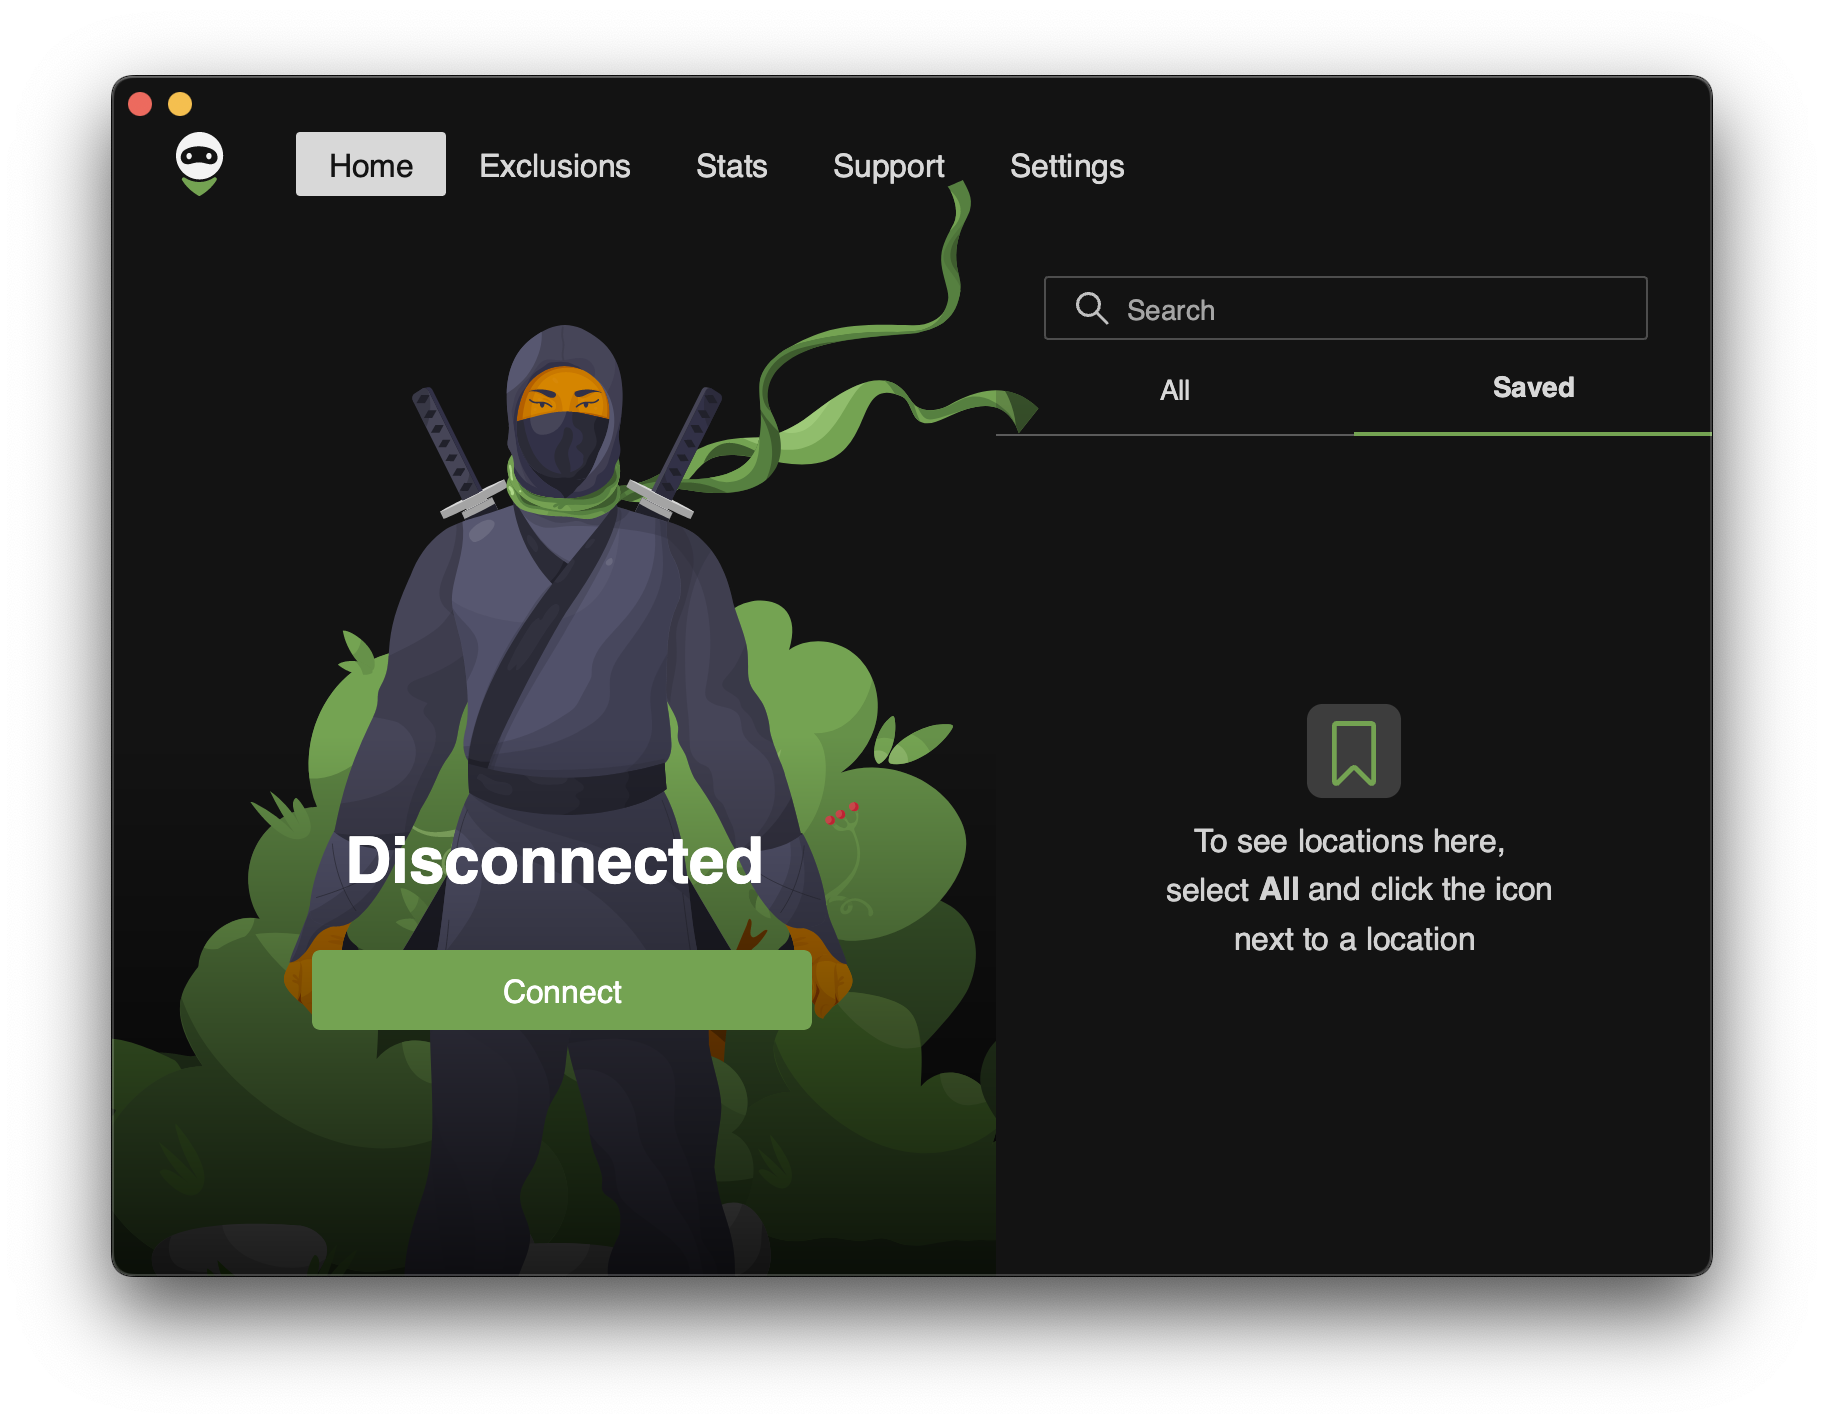
The first tab is the Home screen. Here you can see the current status of AdGuard VPN, the selected location (if enabled) and its ping. Ping is the response time of a VPN server. The lower the number, the faster the connection. If VPN is disabled, the last location you connected to is displayed at the bottom.
The fastest locations with the lowest pings are displayed in the upper right corner of the screen. There is also a refresh button that you can click if any locations are offline. Below you can see the full list of locations. The search field makes it easy to find the location you need.
Free users can connect only to certain locations, while others are blocked. Besides, there is a 3 GB monthly traffic limit in the free version.
Kaydedilen konumlar
On the same tab, you can save your favorite locations to access them quickly.
Just hover over a location, click the bookmark icon that appears, and it will be saved. Your marked locations will then show up in the Saved tab.
İstisnalar
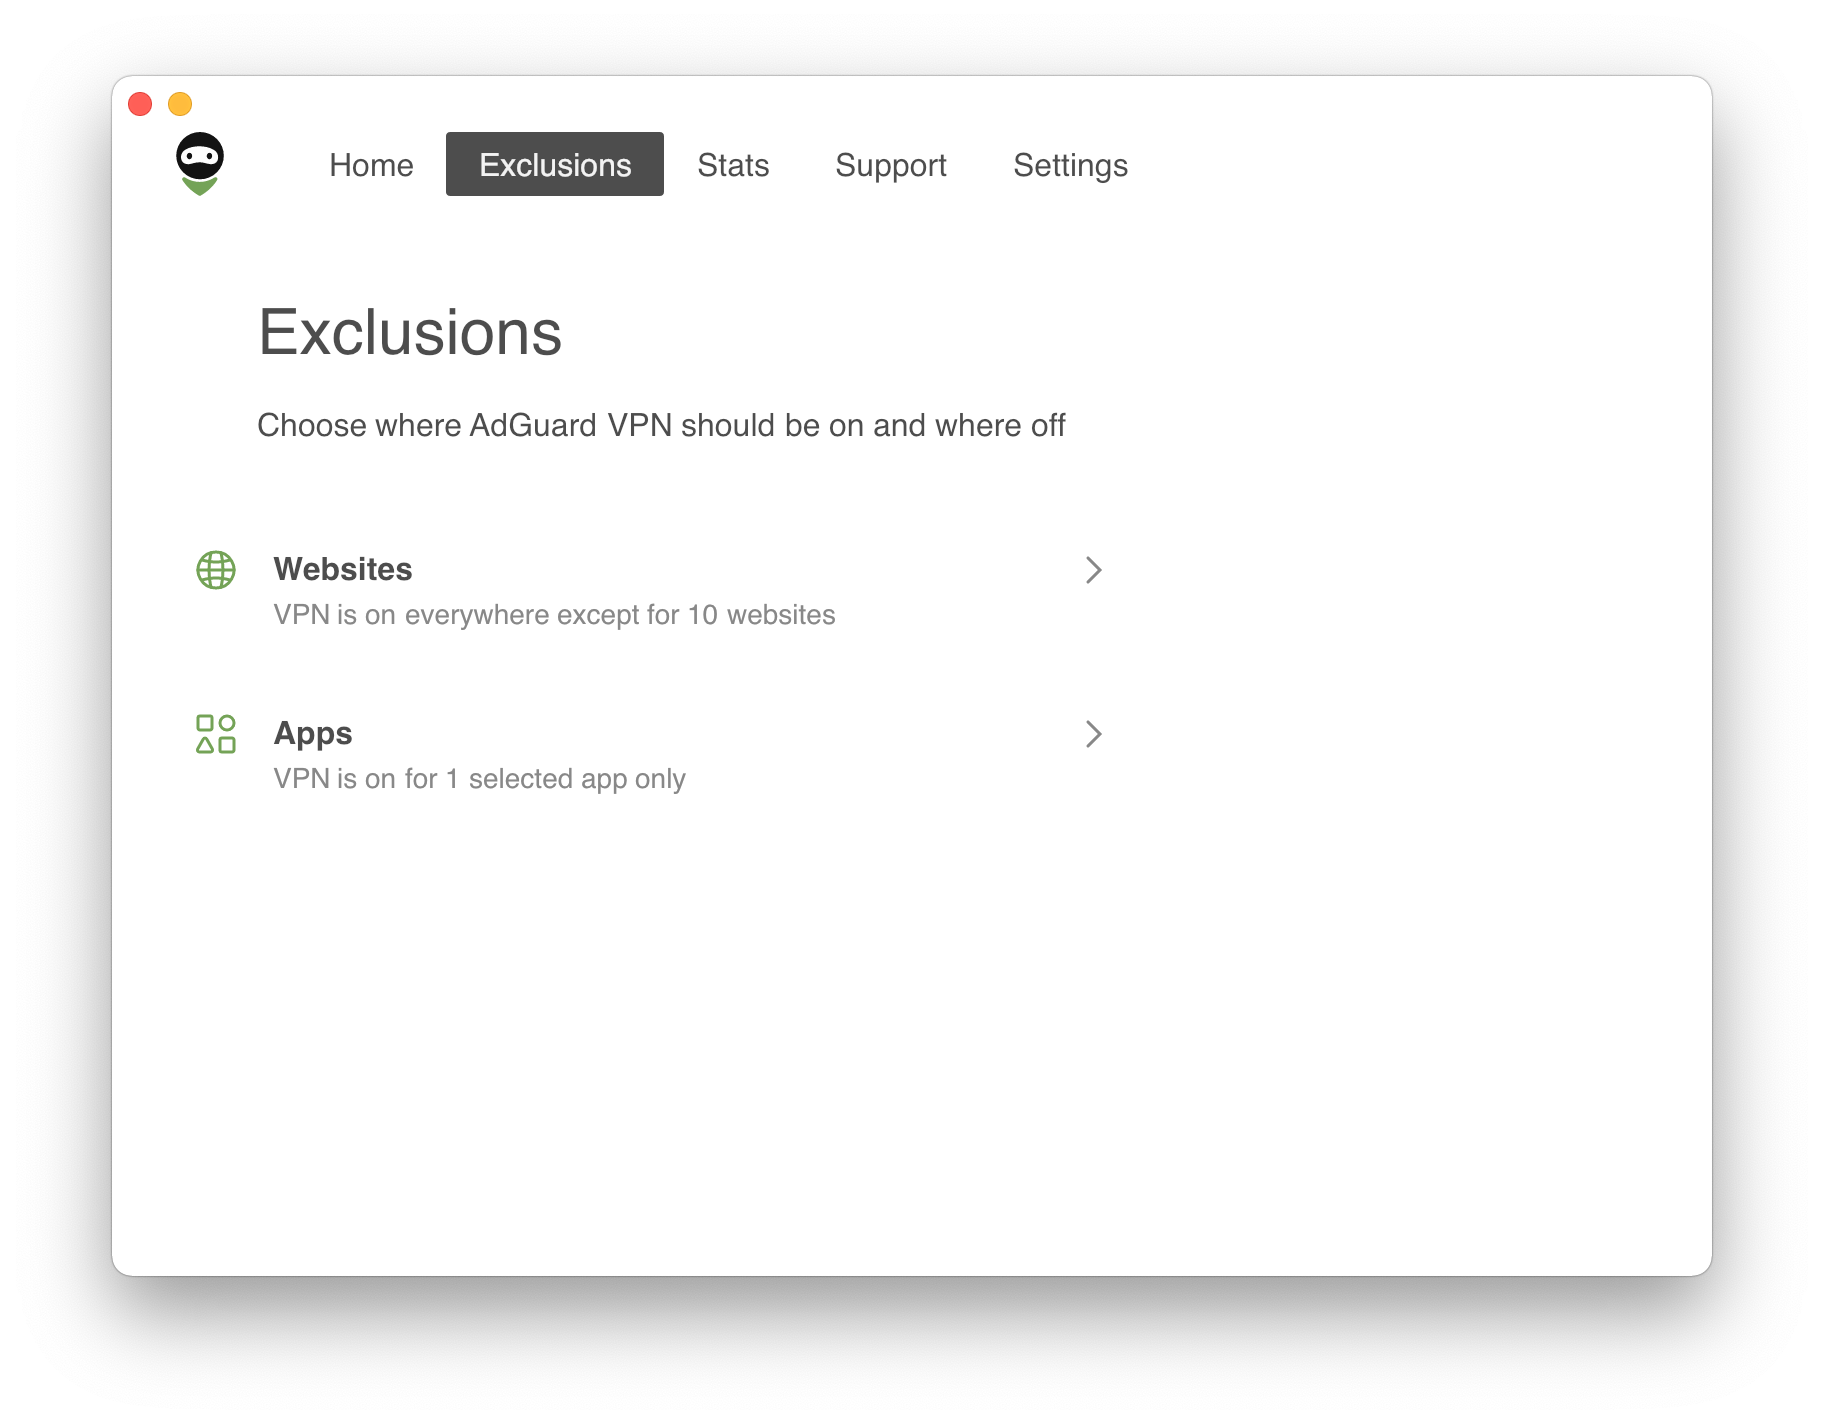
AdGuard VPN has several features that make it unique, and one of them is definitely Exclusions. By default, AdGuard VPN will run on all websites and in all apps but the ones from the exclusions list. But you can switch to the other mode, so AdGuard VPN will run only on websites and in apps from the exclusions list.
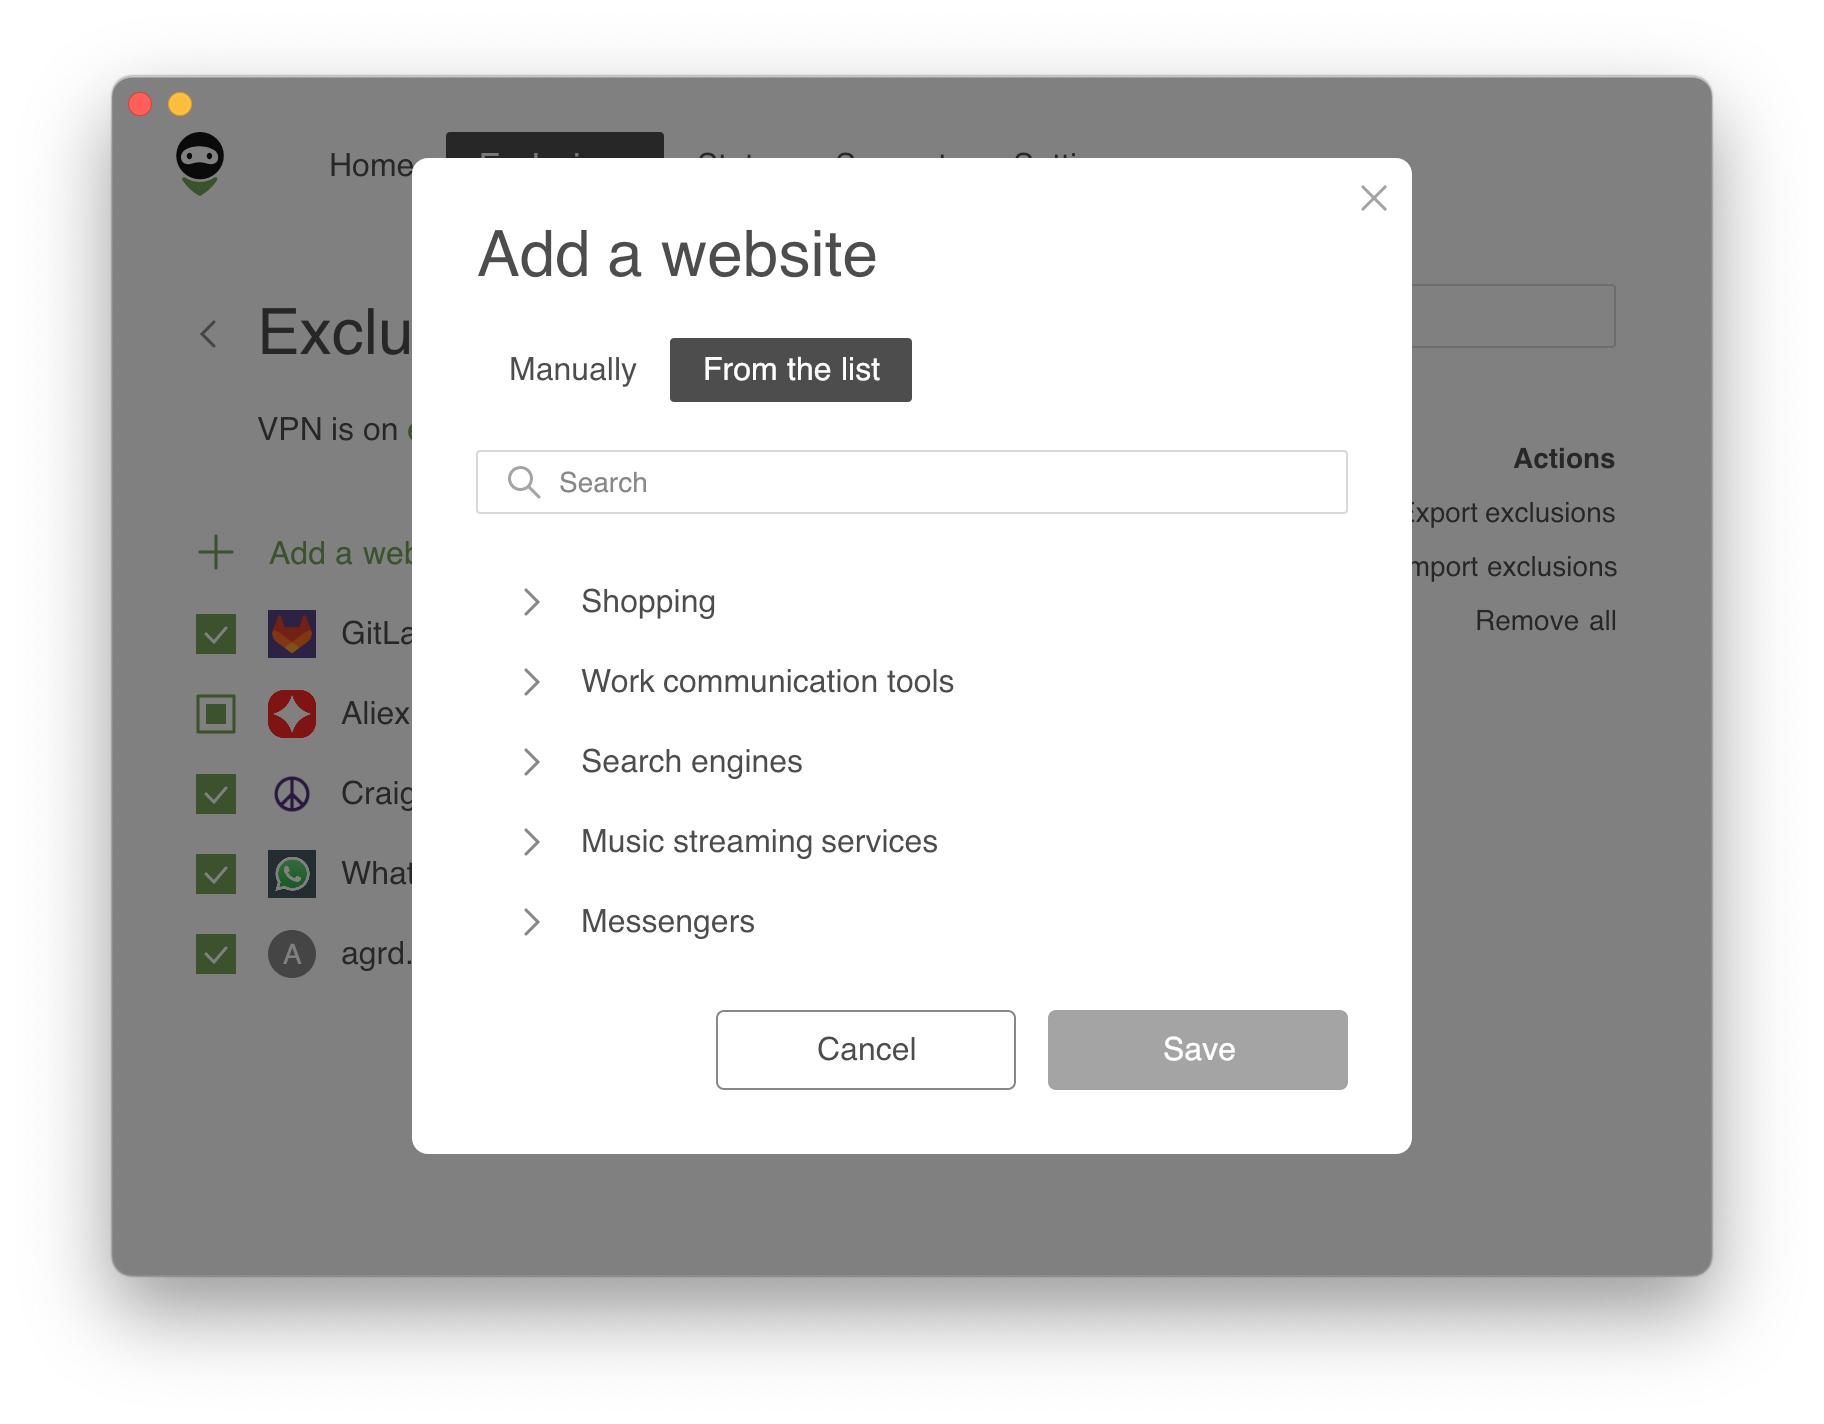
Also you can not only add websites to Exclusions but also choose among the lists of popular services. The lists are divided into eight categories: Social networks, Messengers, Video and Music streaming services, Games, Shopping, Search engines, and Work communication tools. Any of these services can be added to Exclusions in one click! It’s especially convenient if you use Selective mode.
Exclusion list can be easily configured. If you’ve added a domain and some of its subdomains, they’ll be grouped inside the root one. When adding a root domain (example.com) its mask is added too (*.example.com).
Starting with the version 2.4, all browsers are automatically added to the list of exclusions when the VPN is active only for selected apps and websites. This change brings more convenience for users who were often confused and didn’t know whether to consider their browsers as apps or not. It applies under the following conditions:
- Kullanıcı AdGuard VPN'i ilk kez yüklediyse
- Kullanıcı sürüm 2.4'ten önce İstisnalar ayarlarını değiştirmediyse
If you’ve added a service, changed or removed something and now want to recover initial settings, just press Reset to default next to the domain — this action will restore any missing domains and tick all checkboxes.
What’s more, ready-made exclusions lists can be transferred to other devices with installed AdGuard VPN. To export exclusions, follow the four-step instruction below:
- İstisnalar listenizi dışa aktarmak istediğiniz cihazda AdGuard VPN'i açın. Uygun bölümü bulun ve Dışa aktar düğmesine tıklayın.
exclusions.ziparşivi indirilecektir. - Arşivde, her biri Genel ve Seçici listeler için iki
.txtdosyası vardır. Bunlara daha fazla istisna ekleyin, mevcut olanları silin, dosyaları yeniden adlandırın (ancak daha sonra bu konuda daha fazlası) veya arşivi olduğu gibi bırakın. - Farklı cihazlar arasında aktarım yaparken,
.zipdosyasını içe aktarmak için cihaza göndermeyi unutmayın. Örneğin, istisna listeleri Mac'inizden iPhone'unuza aktarırsanız,.zipdosyasını önceden telefonunuza gönderdiğinizden emin olun. - AdGuard VPN'i, hazır istisnaların listesiyle birlikte arşivi içe aktarmak istediğiniz cihazda veya tarayıcıda açın. Uygun bölümü bulun, İçe aktar düğmesine tıklayın ve arşivi seçin. Tamamlandı!
Archive files from other devices can be similarly imported to your AdGuard VPN for Mac.
İstatistikler
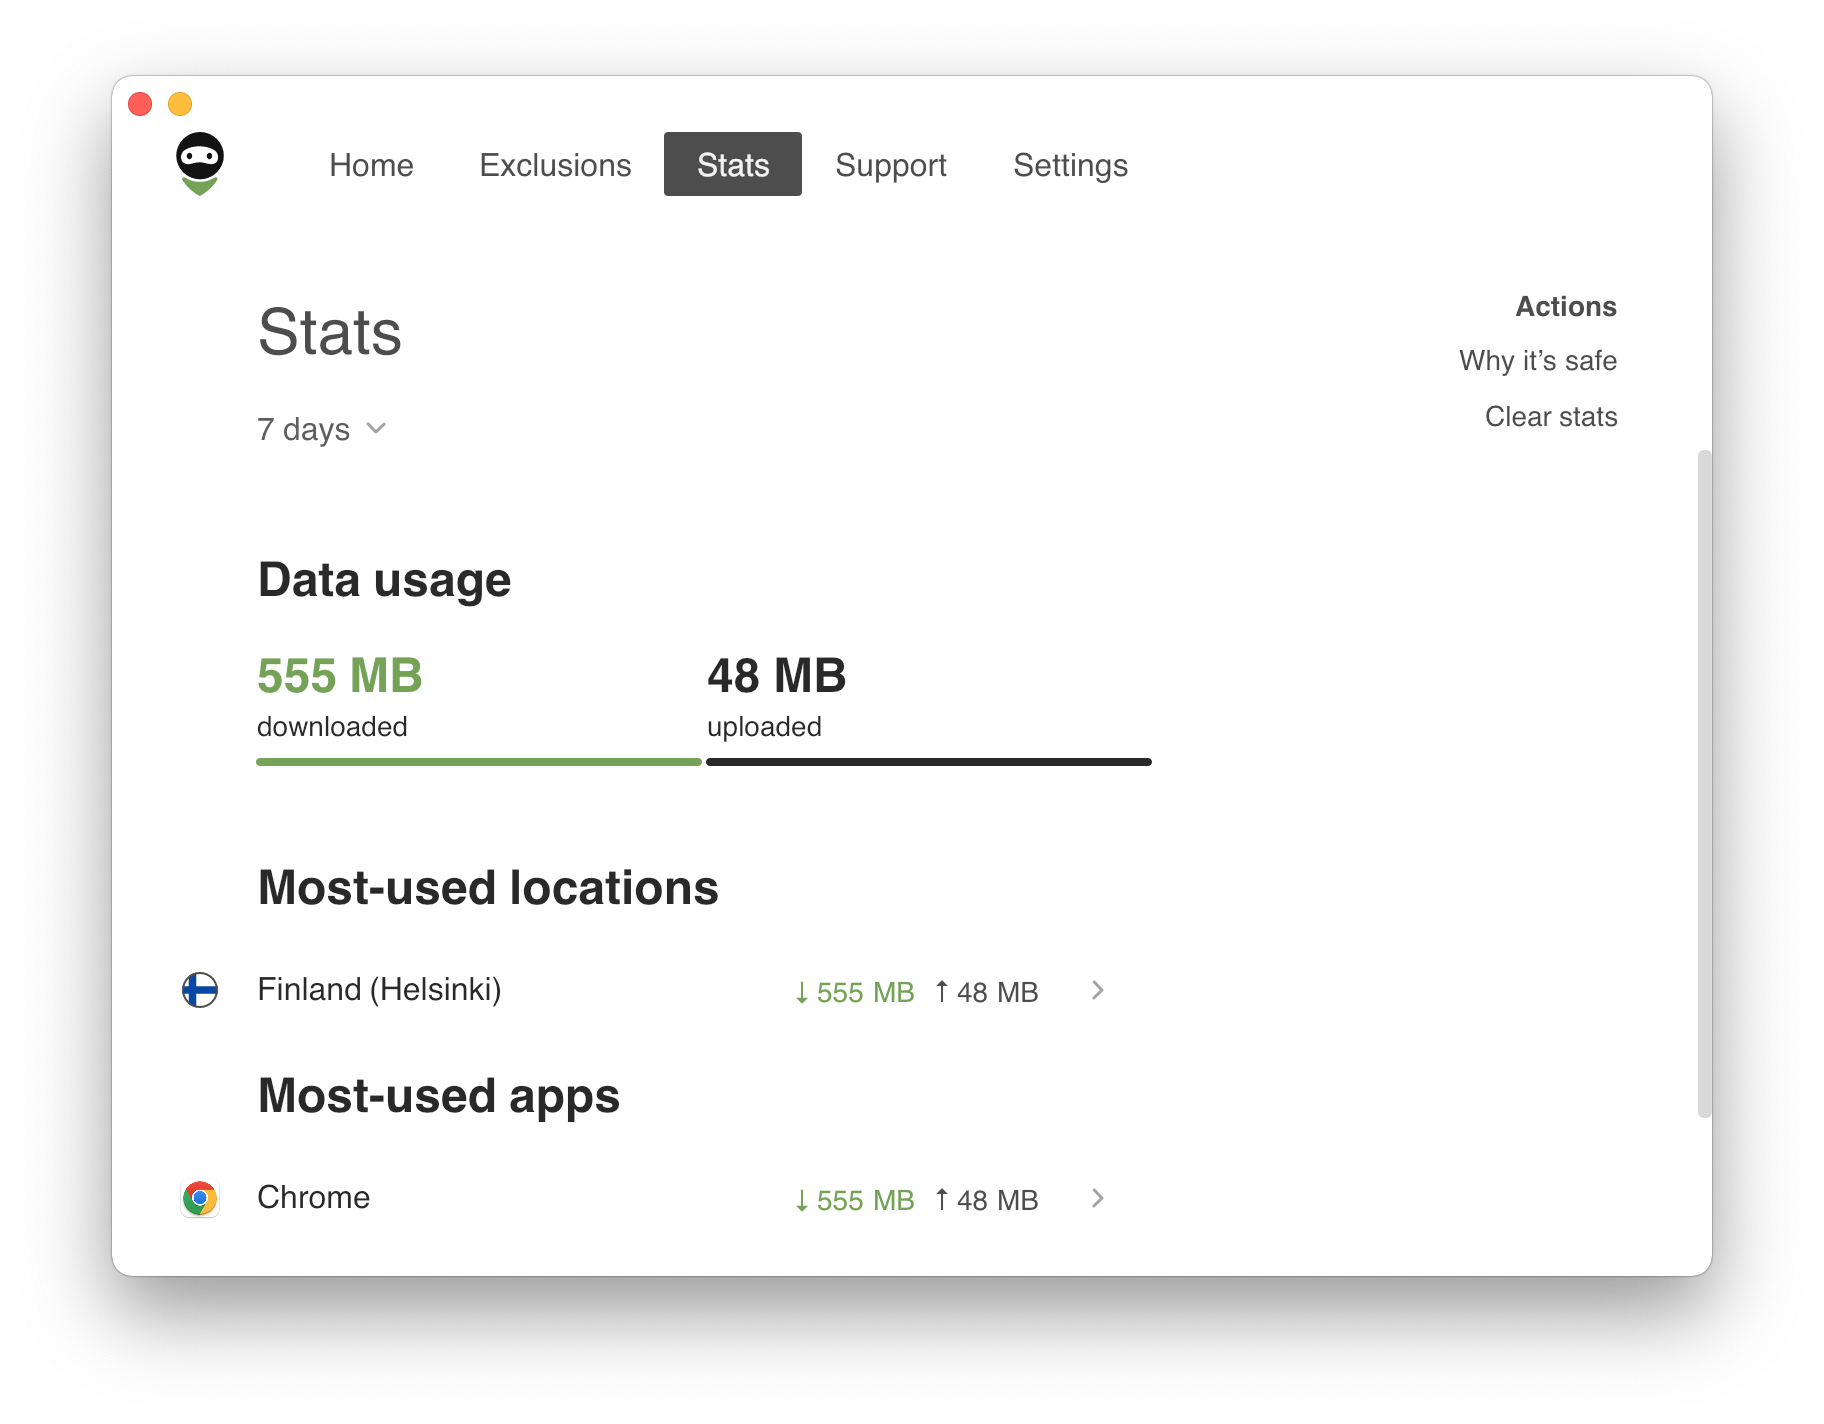
The Stats screen provides detailed information about traffic consumed by location and app, most used locations and apps. View data for the day, month, or the entire time AdGuard VPN for Mac has been in use.
Importantly, all data is stored locally on your device, so no one but you has access to it. The Statistics feature is available to users with an AdGuard VPN subscription.
Destek
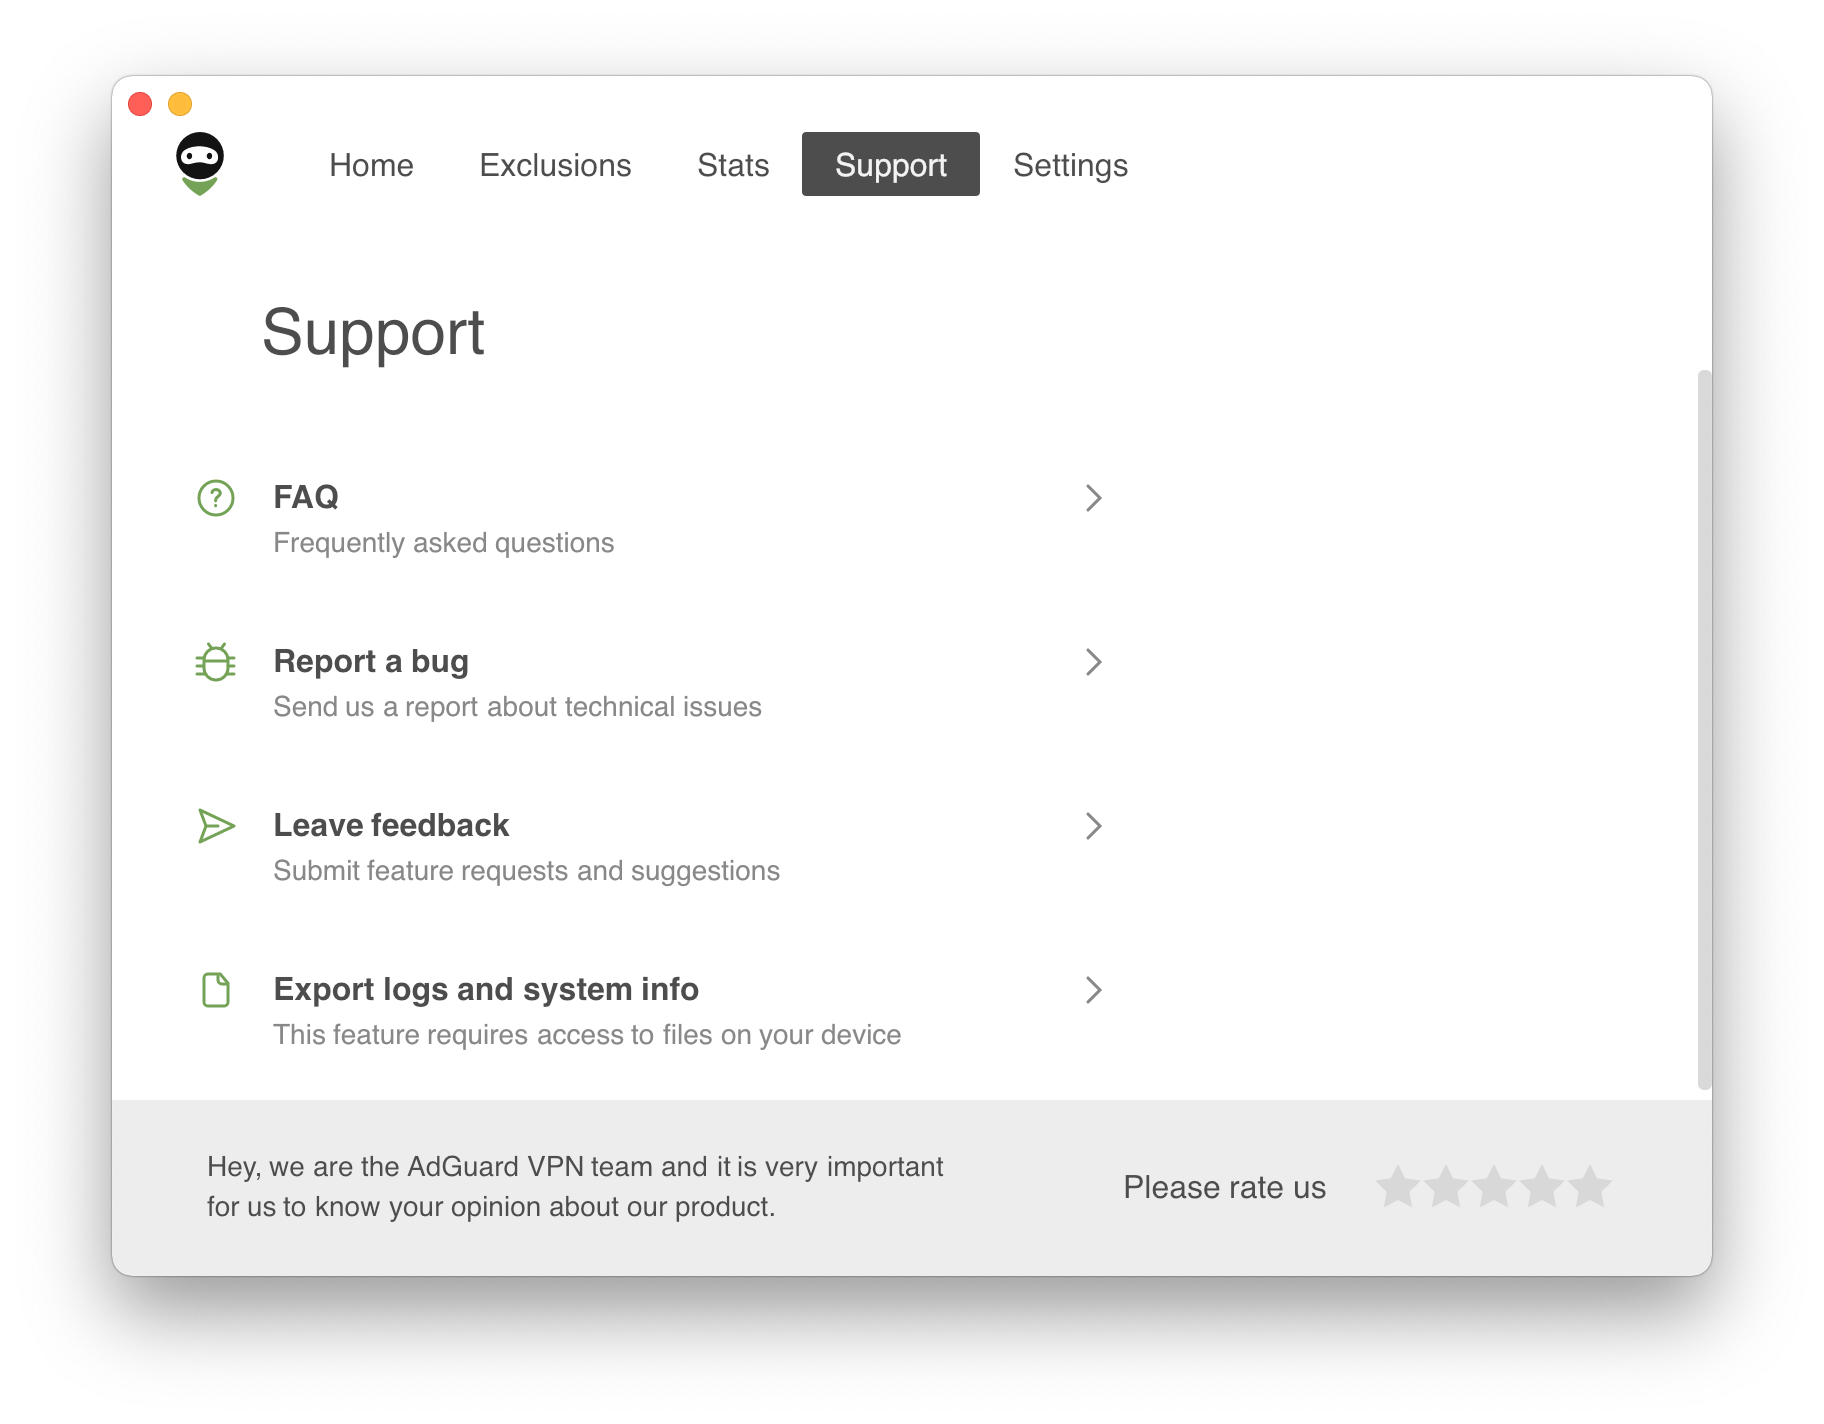
The fourth tab is the Support screen. Find answers to any questions in the FAQ or in the Knowledge base sections, report a bug if you encounter one, or discuss AdGuard on any of the platforms. And feel free to leave feedback about our product, we’d appreciate it.
Ayarlar
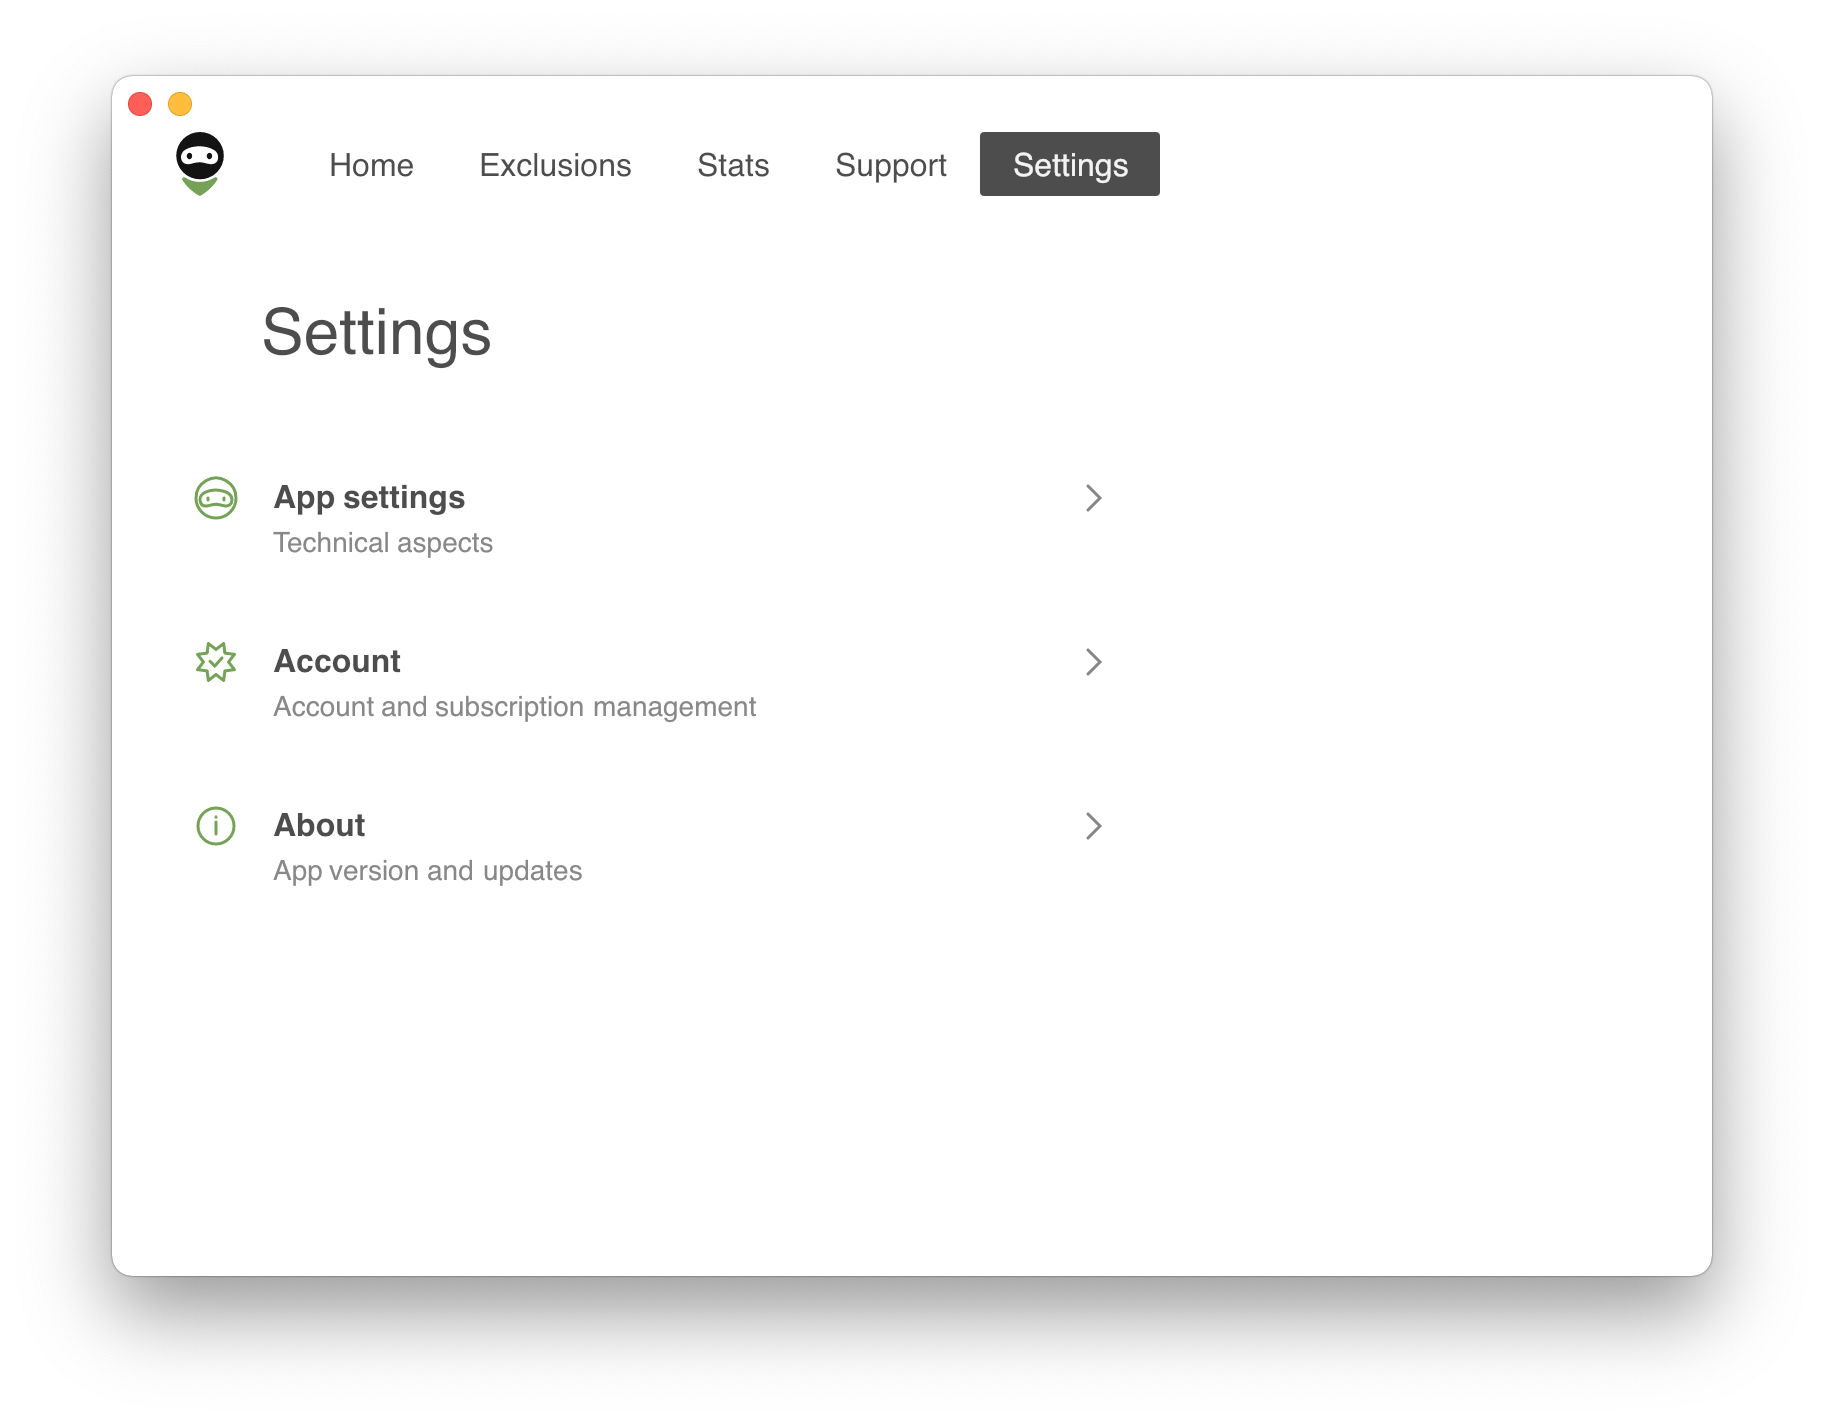
Finally, we come to the Settings tab. In the About program section you can see the current version of AdGuard VPN, check for updates, visit our official website, and get acquainted with AdGuard’s EULA and Privacy policy. In the About license section you can upgrade from free to unlimited, manage your subscription, or log out. And most importantly, from here you can access General settings.
Uygulama ayarları
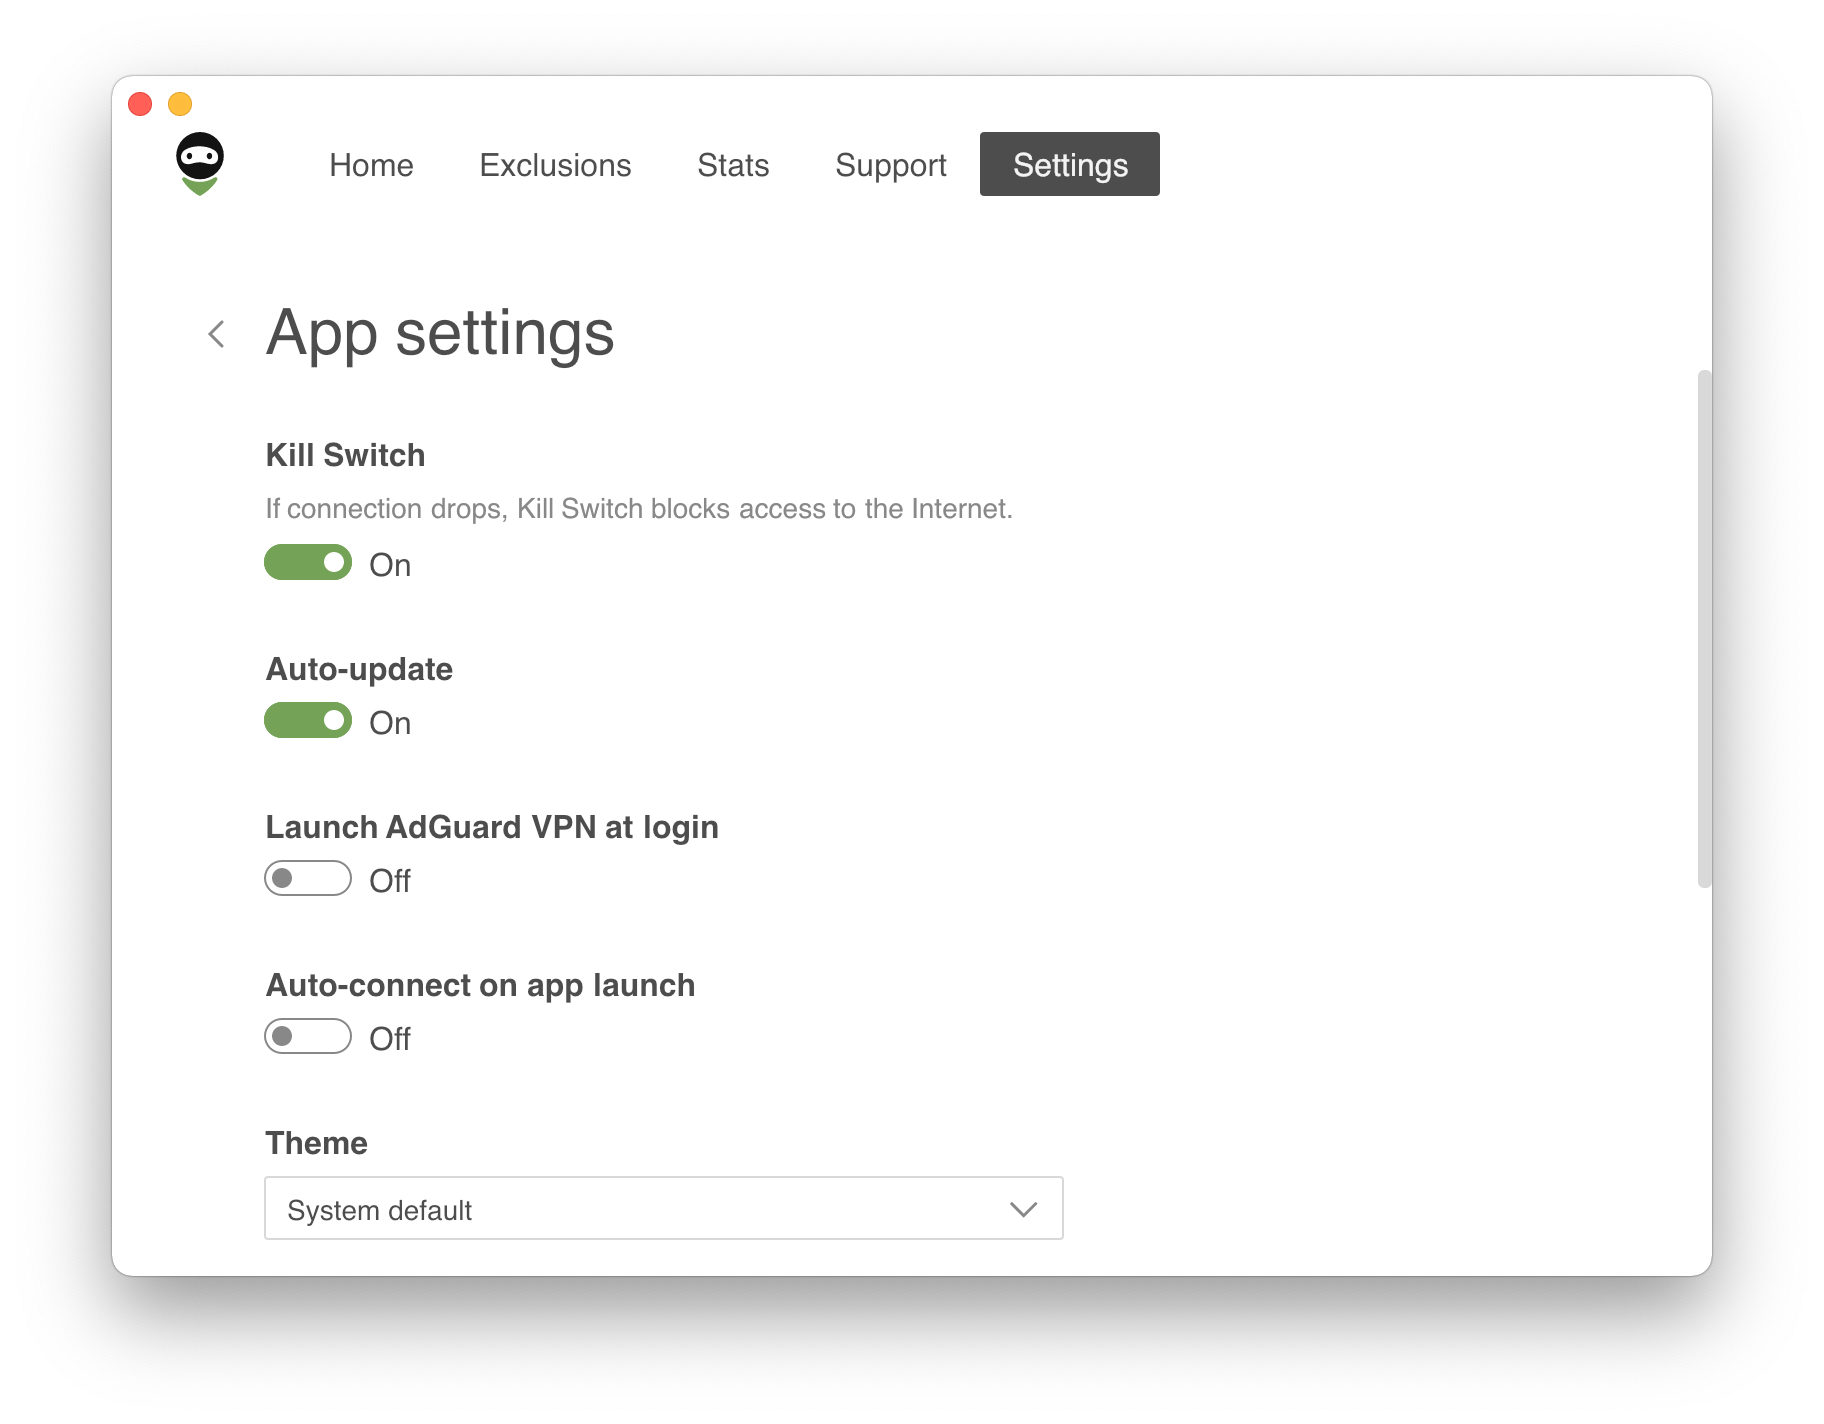
The first four basic features make the application more convenient and user-friendly, i.e. Kill Switch, Auto-update, Launch AdGuard VPN at login, and Auto-connect on app launch. What’s more, you can choose between light, dark, and system themes — the latter one matches the theme on your Mac.
You can also allow AdGuard VPN to gather and send anonymized crash reports, technical and interaction data in order to help us improve our app. Last but not least, you can export logs from your Mac. This can be useful if you want to attach logs to your message to support.
DNS sunucuları
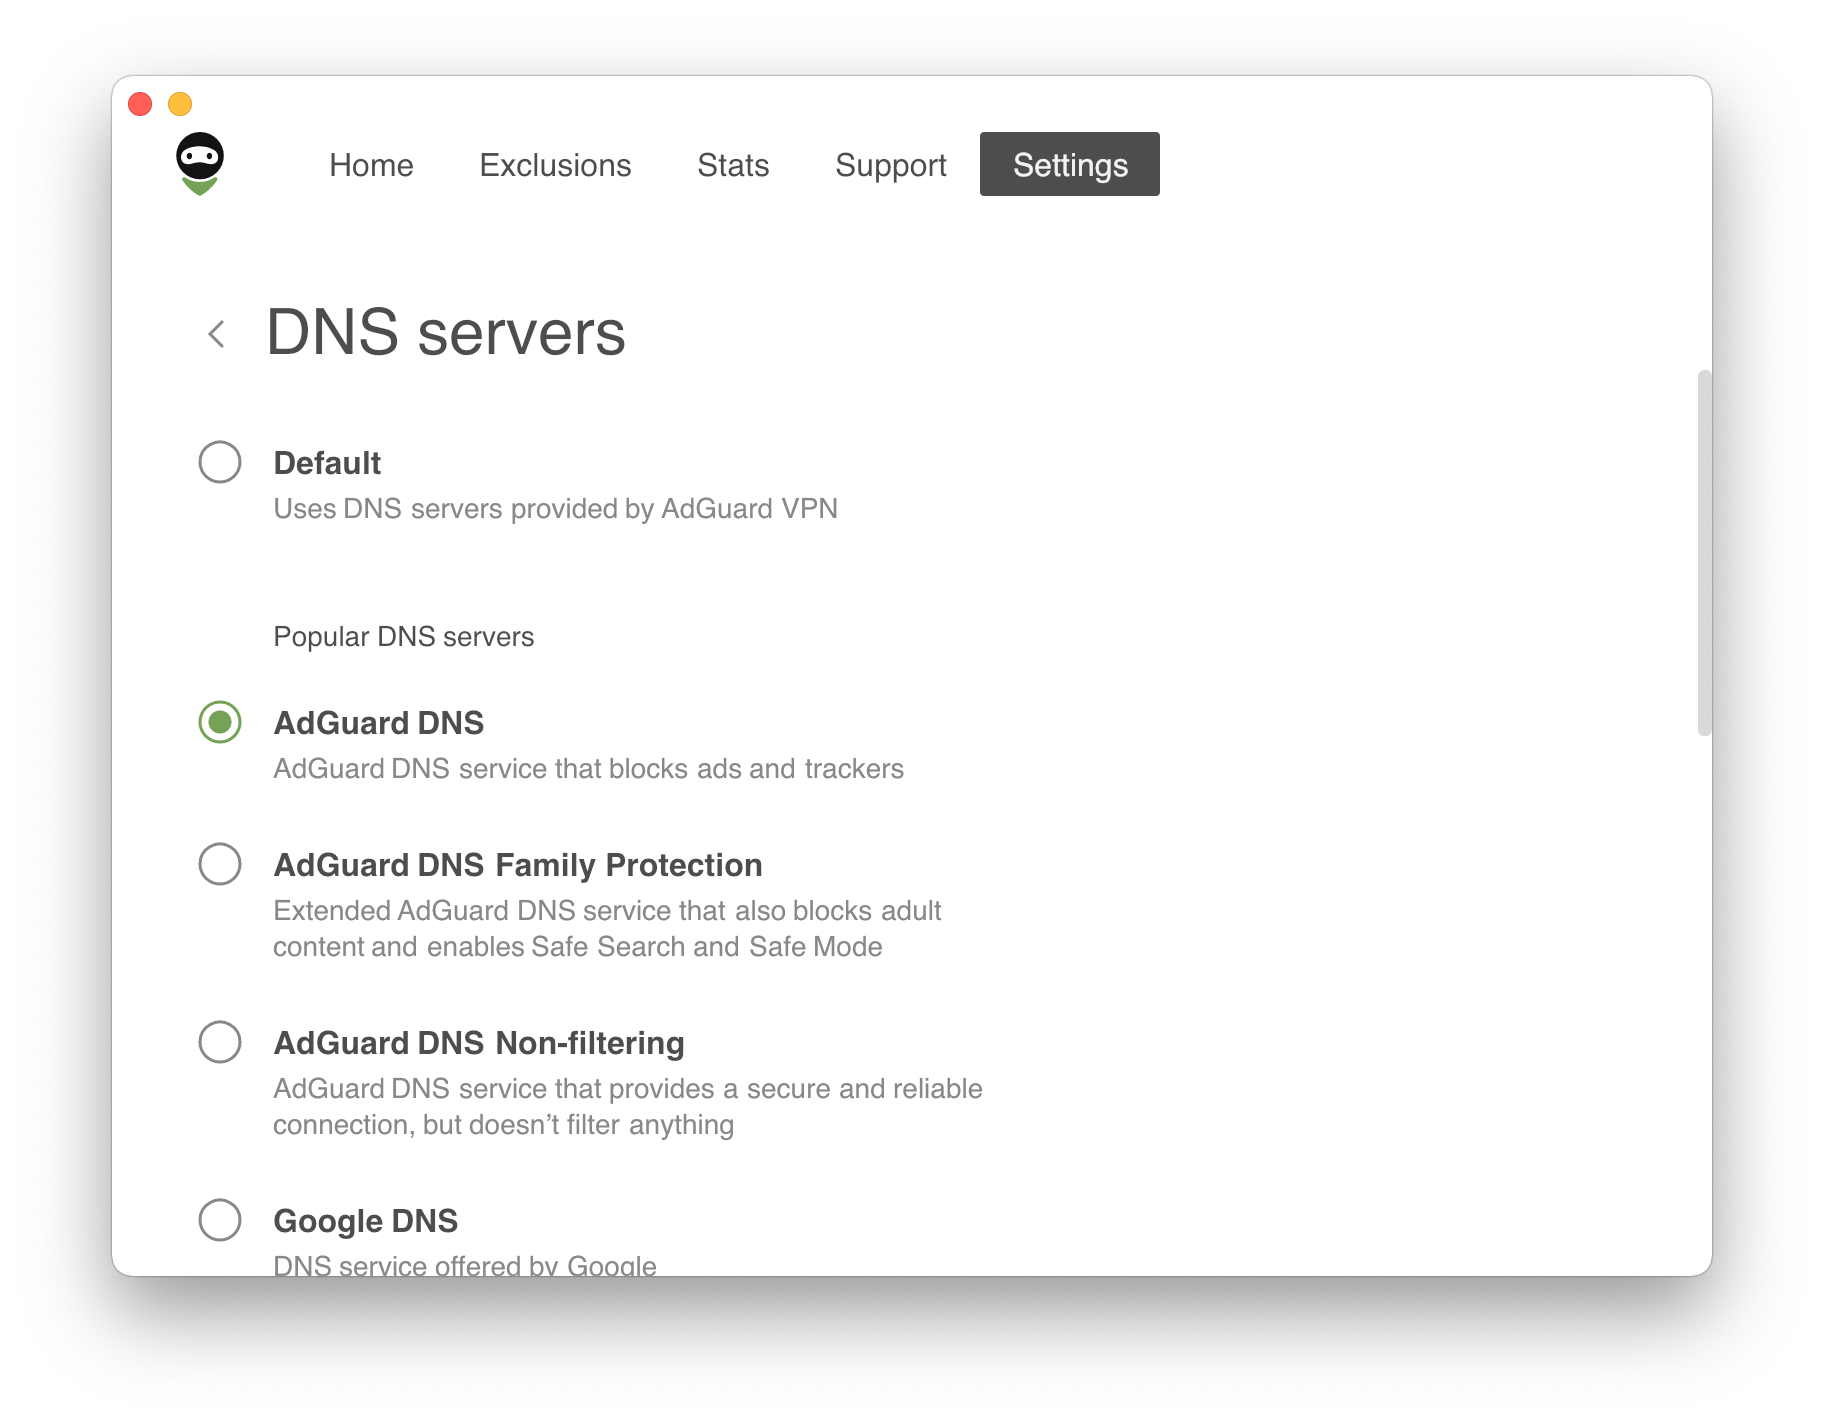
One or more DNS servers can be set up here. This is useful if you don’t want to rely on the default DNS server provided by your ISP. Select one from the list of popular DNS services or add a custom server manually. We recommend adding AdGuard DNS, which not only encrypts your DNS traffic, but also identifies requests to malicious websites and redirects them to a “black hole”.
Gelişmiş ayarlar
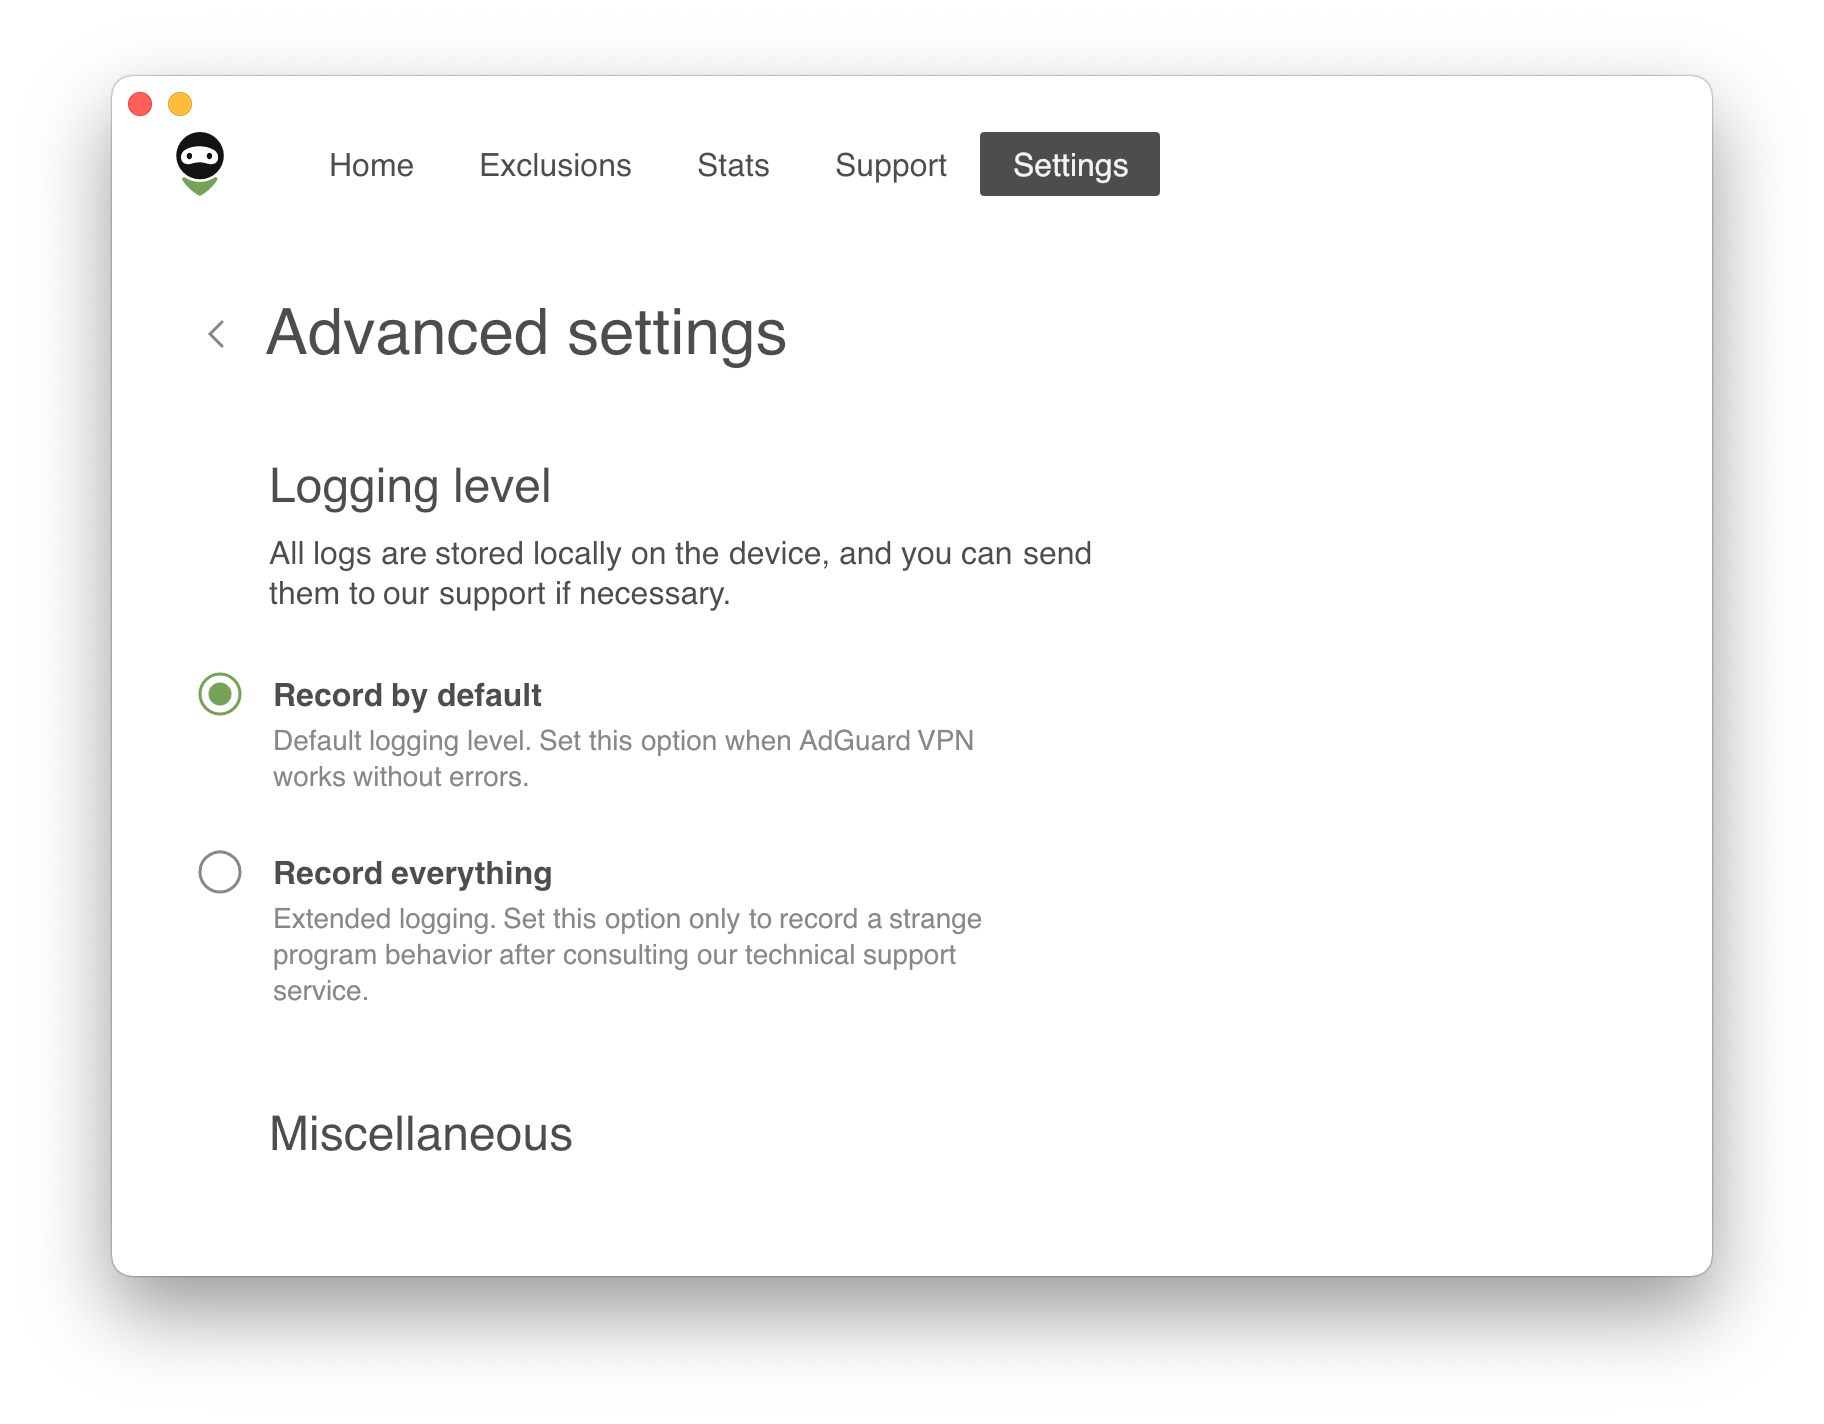
Günlük kayıt düzeyi
There are only two logging levels but we strongly recommend that you use the first, default one. The second option (extended logging) should be set only to record a strange program behavior after consulting our technical support. If you have enabled the extended logging level, make sure to switch to the default one after recording logs.
Menü çubuğu simgesini gizle
Although this option is located in Advanced settings, it can be enabled without hesitation. You can hide the AdGuard VPN icon from the menu bar, it won’t prevent our app from running in the background.
AdGuard VPN protokolü
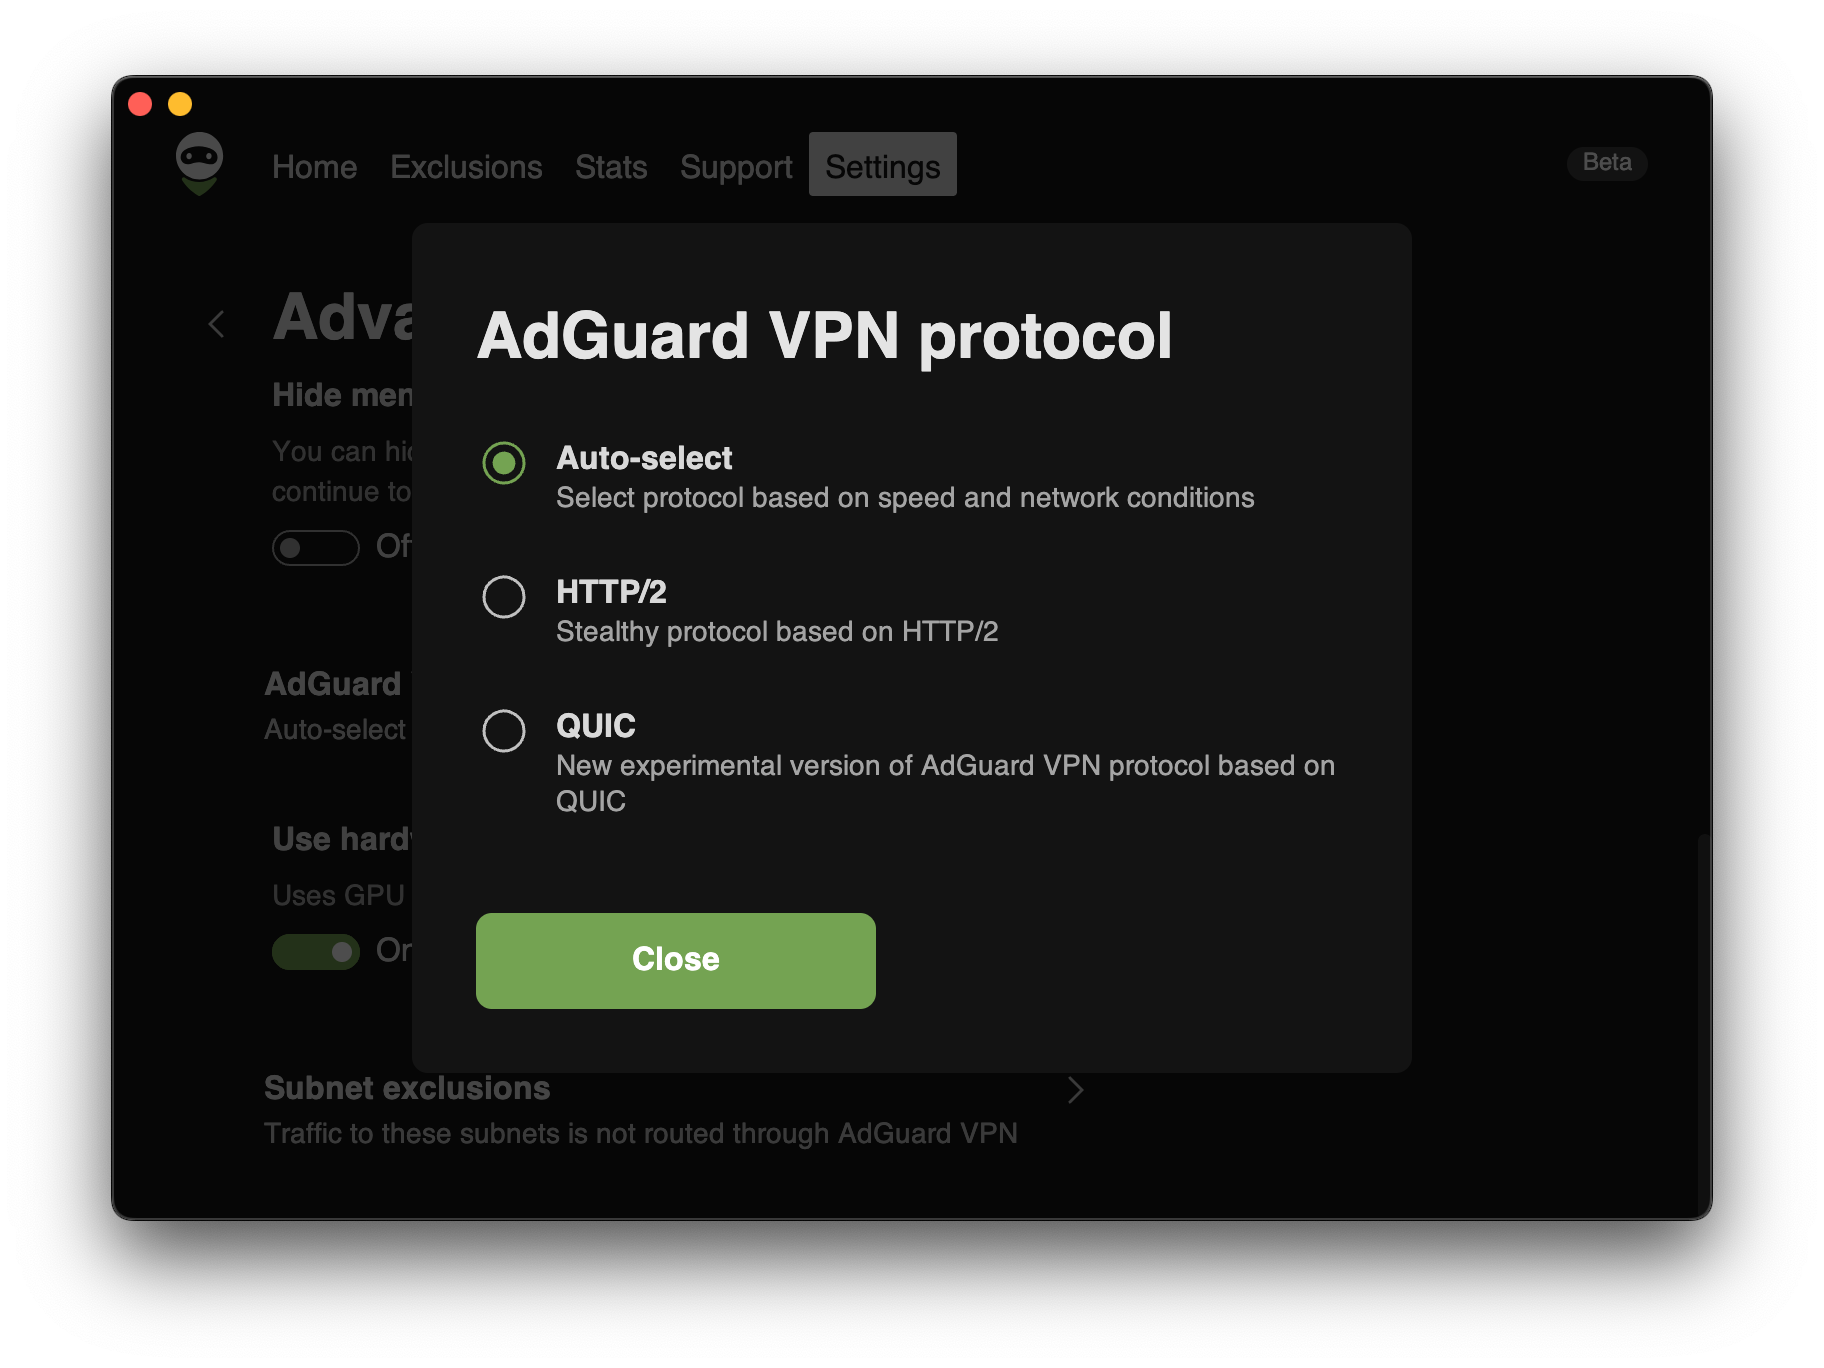
By default, AdGuard VPN protocol uses dynamic VPN protocol selection (Auto-select option). That means that AdGuard VPN automatically figures out which protocol — HTTP2/TLS or HTTP3/QUIC — will give you the best performance and switches to it instantly. This improves VPN speed and stability, which is particularly helpful in regions where VPN usage is restricted or unreliable.
If you wish, you can switch AdGuard VPN to use only HTTP2/TLS or HTTP3/QUIC protocol instead of Auto-select. Each protocol has its strengths, but the best choice can vary depending on your location, network conditions, and even the server you connect to.